Before we dive into the details of making Instant Pot Mongolian Beef, let’s talk about what to serve alongside this savory dish. The right accompaniments can elevate your meal experience from good to unforgettable.
Consider pairing your Mongolian Beef with steamed jasmine rice. The fluffy texture of the rice perfectly absorbs the rich sauce from the beef. Alternatively, you might enjoy a fresh cucumber salad. The cool crunch of cucumbers, combined with a light vinegar dressing, offers a refreshing contrast to the meat.
Another delightful option is a simple side of stir-fried broccoli. This will not only add color to your plate but also provide a healthy balance. Don’t forget to have some spring rolls or egg rolls on hand if you want to introduce even more texture and flavors to your meal.
Ready to get cooking? Let’s jump into the world of Instant Pot Mongolian Beef!

Have you ever found yourself wondering how to create a restaurant-worthy dish right at home? I know that feeling all too well. The allure of savory Mongolian Beef, often associated with dining out, drew me in. The combination of tender beef and a sweet, savory sauce is irresistible. The Instant Pot made it simple. This kitchen wizard cooked the beef to perfection in no time. So, I decided to share my experience with you. I’ll walk you through the process, share some tips, and help you create a flavor-packed meal that will impress anyone.
What is Instant Pot Mongolian Beef?
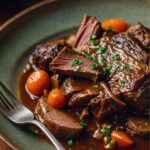
Instant Pot Mongolian Beef is a quick, flavorful dish that features thinly sliced flank steak cooked in a sweet and savory sauce made from soy sauce, brown sugar, garlic, and ginger. Traditionally, this dish is stir-fried, but the Instant Pot version allows for all those delicious flavors to meld together without the extra step of frying. You end up with tender, mouth-watering beef that practically falls apart. The Instant Pot not only speeds up the cooking time but also maintains moisture and enhances the flavor profile.
The Flavor Profile of This Dish
When it comes down to flavors, Instant Pot Mongolian Beef is a delightful mix of sweet, salty, and umami. The low-sodium soy sauce brings depth, while the brown sugar adds a delightful sweetness that balances the saltiness. Fresh ginger and garlic elevate the dish with their warmth and zest, rounding out the flavor profile. Each bite is an orchestra of tastes—there’s a bit of heat from the ginger, sweetness from the sugar, and a salty richness from the soy sauce. By the time you finish your first serving, you’ll likely want more.
You will also like the following Lunch recipes!
- Panda Express Chicken Egg Rolls
- Copycat Stuffed Cabbage Rolls
- Cheesecake Factory Avocado Egg Rolls Recipe
What Makes This Recipe Different From Other Instant Pot Mongolian Beef Recipes?
There are countless recipes for Mongolian Beef online, but this one stands apart due to the use of both beef stock and toasted sesame oil. The beef stock adds complexity and richness, while the sesame oil enhances the dish’s overall depth. Additionally, the methodical step-by-step guide ensures consistent outcomes, making it accessible for anyone, even if you’re not a kitchen wizard.
Ingredients You’ll Need
To create this mouth-watering dish, gather the following ingredients:
- 1.5 pounds flank steak, thinly sliced
- 2 green onions, sliced (for freshness and mild bite)
- 1 cup julienned carrots
- 3/4 cup packed light brown sugar
- 3/4 cup low-sodium soy sauce
- 3/4 cup beef stock
- 2 tablespoons toasted sesame oil
- 2 tablespoons cornstarch (for thickening)
- 1 tablespoon freshly grated ginger (adds warmth and zest)
- 2 garlic cloves, finely minced
- Salt and pepper to taste (optional)
Each ingredient plays a crucial role in achieving that unforgettable flavor!

Step by Step Directions
Step 1: Prepare the Flank Steak
Start by slicing the flank steak into thin strips. This ensures it cooks evenly. Make sure to cut against the grain for tender results. If you’re in a hurry, partially freeze the steak for about 30 minutes to make slicing easier.
Step 2: Sauté Aromatics
Turn on the Instant Pot and select the sauté function. Add the sesame oil. Once heated, toss in the minced garlic and grated ginger. Sauté for about 30 seconds until fragrant. Your kitchen will start to smell heavenly!
Step 3: Brown the Beef
Add the sliced flank steak to the pot. Season with a pinch of salt and pepper (if using). Sauté for about 3-4 minutes until the meat is just browned. Don’t worry if it’s not fully cooked; the pressure cooking will finish the job.
Step 4: Create the Sauce
Next, in a separate bowl, combine the brown sugar, soy sauce, and beef stock. Stir until the sugar dissolves. Pour this mixture over the browned beef in the Instant Pot.
Step 5: Pressure Cook
Secure the lid on the Instant Pot, ensuring the valve is set to sealing. Select the “Pressure Cook” function and set the timer for 10 minutes. The pot will take some time to come to pressure, but the wait will be worth it!
Step 6: Quick Release
Once the cooking time is up, perform a quick release by carefully switching the valve to venting. Be cautious of the steam! Open the lid once the steam has fully released.
Step 7: Thicken the Sauce
In a small bowl, mix the cornstarch with a couple of tablespoons of cold water to create a slurry. Switch the Instant Pot back to sauté mode. Stir the slurry into the sauce and let it simmer for 2-3 minutes until thickened.
Step 8: Final Touches
Add the julienned carrots and sliced green onions to the pot. Stir everything together and let it warm up for another minute. Adjust the seasoning if needed.
Step 9: Serve
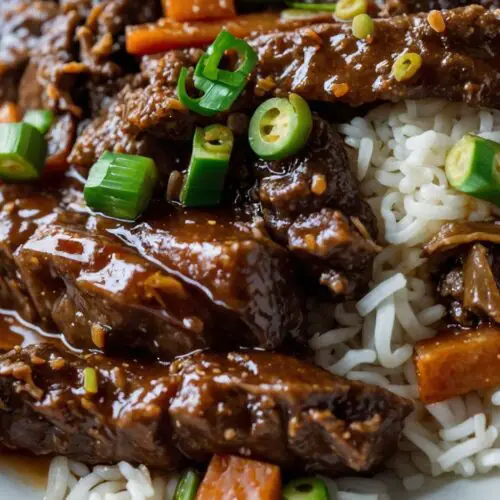
Now it’s time to serve! Spoon the Mongolian beef over a bed of jasmine rice or noodles. Garnish with extra green onions if desired. Dazzling, isn’t it?
Tips On Making Instant Pot Mongolian Beef
1. Slice the Beef Properly: Always cut against the grain for maximum tenderness.
2. Use High-Quality Ingredients: The better the quality of your soy sauce and sesame oil, the richer the flavor will be.
3. Adjust Sweetness: If you prefer less sweet, reduce the amount of brown sugar.
4. Let It Rest: After cooking, let the dish sit for a few minutes before serving to enhance the flavors.
5. Pair Wisely: Think outside the box with your sides. You can easily swap rice for quinoa or even cauliflower rice for a healthier option.
Nutrition Information
Let’s break down the nutrition for this delightful dish:
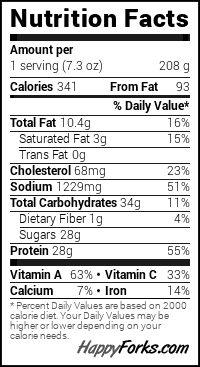
Adjustments can be made based on ingredient choices.
How Can I Store This Instant Pot Mongolian Beef?
Leftovers can be a lifesaver during busy weeks. To store your dish, let it cool completely, then transfer it to an airtight container. It can be kept in the fridge for up to four days. Reheat it in the microwave, or for better texture, using the stovetop with a splash of water can prevent it from drying out.

Substitute Options for Ingredients
Sometimes the pantry doesn’t match the recipe. Here are some alternatives if you find yourself missing ingredients:
- Flank Steak: If flank steak is unavailable, try sirloin steak or chicken breast as a lean alternative.
- Soy Sauce: In a pinch, tamari or liquid aminos can serve as gluten-free substitutes.
- Brown Sugar: Coconut sugar or even honey can replace brown sugar, though it may alter the flavor slightly.
- Cornstarch: Arrowroot powder or flour can be used to thicken the sauce if cornstarch is out of reach.
Instant Pot Mongolian Beef Recipe
Equipment
- Instant Pot
- Whisk
Ingredients
- 1.5 pounds flank steak
- 2 green onions
- 1 cup julienned carrots
- 3/4 cup packed light brown sugar
- 3/4 cup low-sodium soy sauce
- 3/4 cup beef stock
- 2 tablespoons toasted sesame oil
- 2 tablespoons cornstarch
- 1 tablespoon freshly grated ginger
- 2 garlic cloves
- Salt and pepper
Instructions
Step 1: Prepare the Flank Steak
- Start by slicing the flank steak into thin strips. This ensures it cooks evenly. Make sure to cut against the grain for tender results. If you’re in a hurry, partially freeze the steak for about 30 minutes to make slicing easier.
Step 2: Sauté Aromatics
- Turn on the Instant Pot and select the sauté function. Add the sesame oil. Once heated, toss in the minced garlic and grated ginger. Sauté for about 30 seconds until fragrant. Your kitchen will start to smell heavenly!
Step 3: Brown the Beef
- Add the sliced flank steak to the pot. Season with a pinch of salt and pepper (if using). Sauté for about 3-4 minutes until the meat is just browned. Don’t worry if it’s not fully cooked; the pressure cooking will finish the job.
Step 4: Create the Sauce
- Next, in a separate bowl, combine the brown sugar, soy sauce, and beef stock. Stir until the sugar dissolves. Pour this mixture over the browned beef in the Instant Pot.
Step 5: Pressure Cook
- Secure the lid on the Instant Pot, ensuring the valve is set to sealing. Select the “Pressure Cook” function and set the timer for 10 minutes. The pot will take some time to come to pressure, but the wait will be worth it!
Step 6: Quick Release
- Once the cooking time is up, perform a quick release by carefully switching the valve to venting. Be cautious of the steam! Open the lid once the steam has fully released.
Step 7: Thicken the Sauce
- In a small bowl, mix the cornstarch with a couple of tablespoons of cold water to create a slurry. Switch the Instant Pot back to sauté mode. Stir the slurry into the sauce and let it simmer for 2-3 minutes until thickened.
Step 8: Final Touches
- Add the julienned carrots and sliced green onions to the pot. Stir everything together and let it warm up for another minute. Adjust the seasoning if needed.
Step 9: Serve
- Now it’s time to serve! Spoon the Mongolian beef over a bed of jasmine rice or noodles. Garnish with extra green onions if desired. Dazzling, isn’t it?
Notes
- Slice the Beef Properly: Always cut against the grain for maximum tenderness.
2. Use High-Quality Ingredients: The better the quality of your soy sauce and sesame oil, the richer the flavor will be.
3. Adjust Sweetness: If you prefer less sweet, reduce the amount of brown sugar.
4. Let It Rest: After cooking, let the dish sit for a few minutes before serving to enhance the flavors.
5. Pair Wisely: Think outside the box with your sides. You can easily swap rice for quinoa or even cauliflower rice for a healthier option.
Nutrition
Frequently Asked Questions
1. Can I make Instant Pot Mongolian Beef in advance?
Absolutely! This dish reheats beautifully. Just store the beef in the refrigerator and heat up when you’re ready.
2. What else can I add to this recipe for more flavor?
Feel free to add vegetables such as bell peppers, snap peas, or mushrooms. They add color and nutrition.
3. How spicy is this dish?
The dish is not meant to be spicy, but if you desire some heat, consider adding diced chili peppers or a splash of Sriracha.
4. Can I freeze Instant Pot Mongolian Beef?
Yes, you can freeze it! Just make sure to store it in a freezer-safe container. It can last for about three months.
5. Is this dish gluten-free?
No, the traditional version isn’t gluten-free due to soy sauce. However, using a gluten-free soy sauce or tamari will solve this issue.
Conclusion
There you have it—your complete guide to Instant Pot Mongolian Beef! With each step clearly laid out, you too can create a delicious, nourishing dish that’s sure to satisfy not just your cravings but also those of any guests you may serve. This recipe saves you time without skimping on flavor, making it perfect for busy nights. Enjoy your cooking adventure, and remember: every meal is an opportunity to create something special! Happy cooking!