Oven Baked Chicken Tenders Recipe - Taste Just Home
If you're like me, you appreciate a good chicken tender. There's something spectacular about that crispy exterior, giving way to juicy chicken inside. Today, I'm excited to share my go-to oven baked chicken tenders recipe.
Not only are they easy to prepare, but they are also a healthier option compared to their fried counterparts. With just a sprinkling of spices and a light coating of breadcrumbs, you'll have a dish everyone will adore.
So, let's dive in and discover just how delicious and simple this recipe can be.

What Are Oven Baked Chicken Tenders?
Oven-baked chicken tenders are made from strips of chicken breast that are seasoned, breaded, and baked until perfectly golden and crisp.
Rather than being submerged in hot oil, these tenders rely on the oven's heat to create that crave-worthy crunch, making them a lighter alternative without sacrificing texture or flavor. The result is juicy chicken on the inside with a satisfying, crispy coating on the outside.
These tenders are incredibly versatile, serving equally well as a family-friendly main dish or a hearty side. Pair them with classic dipping sauces like honey mustard, ranch, or barbecue, or round out the meal with roasted vegetables, fries, or a fresh salad.
If you love that contrast of crunchy coating and tender chicken-and want a healthier way to enjoy it-this recipe is truly a game-changer for your dinner table.
Why You'll Love This Oven Baked Chicken Tenders Recipe?
First off, these tenders are baked, which means you get to skip out on the oil and still achieve that crunch everybody loves. Plus, they are quick to make-perfect for busy weeknights. The best part about this dish?
It's incredibly versatile! You can customize the herbs and spices used in the breading to suit your taste.
Another reason why you'll adore this oven baked chicken tenders recipe is its kid-friendly appeal. I can guarantee it will be a hit with the little ones! Trust me, make these tenders once, and they will be requesting them again and again.
Add in the fact that leftovers can be stored and reheated, and you have a recipe that just keeps on giving.
You will also like the following Dinner recipes!
- Cheesecake Factory Honey Truffle Chicken Copycat
- Instant Pot Orange Chicken
- Slow Cooker Hawaiian Chicken
The Ingredients
Batter
- 1 large egg
- 1 tablespoon creamy mayonnaise
- 1 ½ tablespoon Dijon mustard
- 2 tablespoon all-purpose flour
- ½ teaspoon sea salt
- Freshly cracked black pepper
- ½ teaspoon garlic powder
Chicken
- 500 g chicken tenderloins
- A light mist of olive oil spray
Breadcrumbs
- 1 ½ cups Japanese-style breadcrumbs
- A light mist of cooking spray

Step-by-Step Instructions
Let's get down to business. Follow these steps closely, and soon you'll have a plate of golden-brown oven baked chicken tenders that will dazzle your taste buds.
Step 1: Preheat the Oven
Take a moment to preheat your oven to 400°F (200°C). This step is crucial for achieving that crispy perfection we're after! While your oven warms up, you have a chance to gather everything else, so don't rush this part.
Step 2: Prepare the Chicken
Grab your chicken tenderloins. You want them to be fresh and (if possible) patted dry with paper towels. This ensures they'll soak up those flavors better. I like to cut my tenderloins into smaller strips. It just makes for easier eating, especially for the kids.
Step 3: Make the Batter
In a mixing bowl, combine the egg, creamy mayonnaise, and Dijon mustard. Mix these ingredients until you see a smooth consistency.
Next, add the all-purpose flour, sea salt, black pepper, and garlic powder. Stir it well; you want everything coated in flavors. This batter is where the magic begins.
Step 4: Coat the Chicken
Take each chicken tender, and immerse it in the batter. Make sure each piece is generously coated. After the tender is well covered, roll it in the Japanese-style breadcrumbs. This type of breadcrumb is fantastic for that extra crunch! Repeat this for all your chicken pieces.
Step 5: Arranging on the Baking Sheet
Now, take a baking sheet and line it with parchment paper. Place each chicken tender on the sheet, ensuring they don't touch; otherwise, you'll lose that lovely crispy texture. Finally, give them a light mist of cooking spray. This will aid in getting a golden finish.
Step 6: Bake the Chicken Tenders
Finally, pop your baking sheet into the preheated oven. Bake for about 15-20 minutes, flipping them halfway through to ensure even cooking.
You're looking for a nice golden brown on the outside. The chicken should reach an internal temperature of 165°F (74°C).
Step 7: Serve and Enjoy!
When the tenders are out of the oven, let them cool for a minute. You can serve them with your favorite dipping sauce, some fresh veggies on the side, or even a simple salad.
This is the moment where you can smell that lovely chicken aroma filling your kitchen-you might just want to dive in right away!
Tips & Tricks
To make the most of your cooking adventure, here are some handy tips:
- Use High-Quality Chicken: Opt for fresh or organic chicken. It makes a difference in flavor.
- Experiment with Spices: Feel free to add your favorite herbs. Paprika, cayenne, or Italian seasoning can elevate the taste.
- Dairy-Free Option: Substitute the mayonnaise with a plant-based alternative if you're dairy-sensitive.
- Breadcrumb Alternatives: Try panko crumbs for an even crunchier texture.
- Parmesan Cheese: Adding a sprinkle of grated parmesan to your breadcrumb mix gives it a cheesy twist.
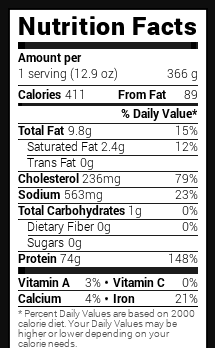
Nutrition Information
Oven Baked Chicken Tenders Recipe Nutrition Facts
Can I Store Oven Baked Chicken Tenders?
Absolutely! Once cooked, store the oven baked chicken tenders in an airtight container in the refrigerator for 3-4 days to keep them fresh and flavorful.
For longer storage, freezing is a great option. Allow the tenders to cool completely, then wrap each one tightly in plastic wrap and place them in a freezer-safe bag or container.
Properly stored, they can last for 2-3 months in the freezer. When ready to enjoy, reheat in the oven or air fryer to bring back their golden crispiness and juicy interior.

What Can I Serve with Oven Baked Chicken Tenders Recipe?
You might be wondering what pairs best with these crispy, golden oven baked chicken tenders. The options are plentiful, so here are a few favorites:
- Dipping Sauces: Ranch, BBQ, or honey mustard all add an extra layer of flavor and tang.
- Vegetable Slaw: A crisp, fresh slaw provides crunch and a refreshing contrast to the tender chicken.
- Salads: A light green salad with a simple vinaigrette balances the richness of the tenders.
- Mashed Potatoes: Creamy, buttery mashed potatoes make for a comforting, hearty side.
- Rice or Quinoa: Both are wholesome, healthy options that round out the meal and soak up any extra sauce.
These pairings make the oven baked chicken tenders recipe dish versatile enough for weeknight dinners or special gatherings, letting you mix and match to suit your taste and occasion.
Variations
Variety is the spice of life, and these chicken tenders are perfect for experimenting with flavors. Here are my top five variations:
- Spicy Buffalo Chicken Tenders: Add cayenne pepper or hot sauce to the batter for a bold kick. Serve with blue cheese dressing for dipping.
- Honey Mustard Glazed: Brush cooked tenders with honey mustard for a sweet and tangy glaze that pairs beautifully with the crispy coating.
- Parmesan Herb: Mix grated Parmesan and Italian herbs into the breadcrumb coating for a flavor-packed, aromatic twist.
- Coconut Crusted: Incorporate shredded coconut into the breadcrumbs for a subtly sweet, exotic touch that adds extra crunch.
- BBQ Chicken Tenders: Marinate the chicken in your favorite BBQ sauce for a few hours before breading and baking, giving the tenders a smoky, savory flavor.
These variations make it easy to switch things up and keep your oven baked chicken tenders recipe dish exciting for any meal or occasion.


Oven Baked Chicken Tenders Recipe
Equipment
- oven
Ingredients
Batter
- 1 large egg
- 1 tablespoon creamy mayonnaise
- 1 ½ tablespoon Dijon mustard
- 2 tablespoon all-purpose flour
- ½ teaspoon sea salt
- Freshly cracked black pepper
- ½ teaspoon garlic powder
Chicken
- 500 g chicken tenderloins
- A light mist of olive oil spray
Breadcrumbs
- 1 ½ cups Japanese-style breadcrumbs
- A light mist of cooking spray
Instructions
Step 1: Preheat the Oven
- Take a moment to preheat your oven to 400°F (200°C). This step is crucial for achieving that crispy perfection we're after! While your oven warms up, you have a chance to gather everything else, so don't rush this part.
Step 2: Prepare the Chicken
- Grab your chicken tenderloins. You want them to be fresh and (if possible) patted dry with paper towels. This ensures they'll soak up those flavors better. I like to cut my tenderloins into smaller strips. It just makes for easier eating, especially for the kids.
Step 3: Make the Batter
- In a mixing bowl, combine the egg, creamy mayonnaise, and Dijon mustard. Mix these ingredients until you see a smooth consistency.
- Next, add the all-purpose flour, sea salt, black pepper, and garlic powder. Stir it well; you want everything coated in flavors. This batter is where the magic begins.
Step 4: Coat the Chicken
- Take each chicken tender, and immerse it in the batter. Make sure each piece is generously coated. After the tender is well covered, roll it in the Japanese-style breadcrumbs. This type of breadcrumb is fantastic for that extra crunch! Repeat this for all your chicken pieces.
Step 5: Arranging on the Baking Sheet
- Now, take a baking sheet and line it with parchment paper. Place each chicken tender on the sheet, ensuring they don't touch; otherwise, you'll lose that lovely crispy texture. Finally, give them a light mist of cooking spray. This will aid in getting a golden finish.
Step 6: Bake the Chicken Tenders
- Finally, pop your baking sheet into the preheated oven. Bake for about 15-20 minutes, flipping them halfway through to ensure even cooking.
- You're looking for a nice golden brown on the outside. The chicken should reach an internal temperature of 165°F (74°C).
Step 7: Serve and Enjoy!
- When the tenders are out of the oven, let them cool for a minute. You can serve them with your favorite dipping sauce, some fresh veggies on the side, or even a simple salad.
- This is the moment where you can smell that lovely chicken aroma filling your kitchen-you might just want to dive in right away!
Notes
- Use High-Quality Chicken: Opt for fresh or organic chicken. It makes a difference in flavor.
- Experiment with Spices: Feel free to add your favorite herbs. Paprika, cayenne, or Italian seasoning can elevate the taste.
- Dairy-Free Option: Substitute the mayonnaise with a plant-based alternative if you're dairy-sensitive.
- Breadcrumb Alternatives: Try panko crumbs for an even crunchier texture.
- Parmesan Cheese: Adding a sprinkle of grated parmesan to your breadcrumb mix gives it a cheesy twist.
Frequently Asked Questions
1. Can I use frozen chicken tenderloins?
Yes, you can use frozen tenderloins. Just ensure they are fully thawed and patted dry before coating and baking.
2. What kind of breadcrumbs are best?
Japanese-style breadcrumbs, or panko, work excellently for a crunchy texture. However, regular breadcrumbs can also do a fine job.
3. Can I make these tenders gluten-free?
Absolutely! Substitute breadcrumbs with gluten-free options and use gluten-free flour to keep them compliant.
4. How do I know when the chicken is done?
Always check using a meat thermometer to ensure your chicken reaches 165°F (74°C).
5. What sides pair well with chicken tenders?
French fries, coleslaw, vegetable sticks, or a simple green salad are all excellent choices.
Conclusion
Making oven-baked chicken tenders is a delightful experience that results in a dish everyone at the table can enjoy.
With a short list of ingredients and simple steps, you can whip up this comfort food in no time. Whether you serve them as a main dish or a snack, these tenders are bound to impress.
I hope you join my chicken tender journey and enjoy the process as much as the final result. These tenders are a fantastic addition to any meal, and I can't wait to hear how yours turn out! Treat yourself and your loved ones to this dish-you'll be glad you did!